
{Let's Learn Photoshop Together}
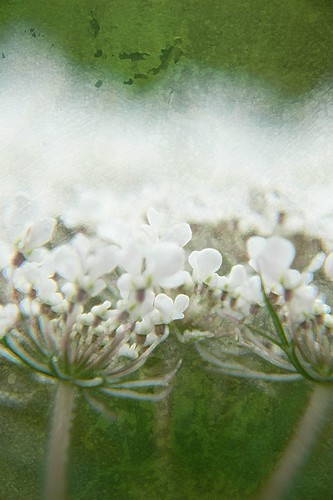
This is what I did with the concrete texture from last weeks exercise.
See what Liss & Elizabeth did with the concrete texture and layers.
Last week we touched base on the basics of how to use layers. A handful of you expressed interest in following along, although I only received 2 links to pictures where you used the texture. If you're not ready to share I understand, but I strongly encourage you to participate when you get a chance. If you did happen to post a photo, but forgot to send your link, you are more than welcome to include it in the comment section of this post.
It takes very little time to sit down and discover what will open many doors for you when processing a photo. I know it sounds cliché, but really, the possibilities will become endless! Once you begin to understand the basics of layers and how they interact with one another, finding different ways to manipulate them is where the real fun begins.
There are other useful tools to be aware of when using layers that weren't addressed in those last two tutorials - this is what we will go over today.
Layer masks are a handy way of applying a certain effect to a particular area of a photo.
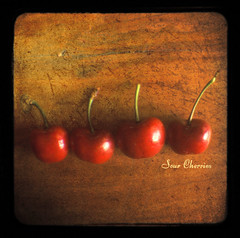
Sour Cherries (pictured below) was an instance where I used a layer mask.
I applied a texture to the photo, but I didn't want it to cover the cherries themselves, so I used a layer mask.
The video below is a pretty basic, but comprehensive tutorial on how to use layer masks.
This is what I did with the concrete texture from last weeks exercise.
See what Liss & Elizabeth did with the concrete texture and layers.
Last week we touched base on the basics of how to use layers. A handful of you expressed interest in following along, although I only received 2 links to pictures where you used the texture. If you're not ready to share I understand, but I strongly encourage you to participate when you get a chance. If you did happen to post a photo, but forgot to send your link, you are more than welcome to include it in the comment section of this post.
It takes very little time to sit down and discover what will open many doors for you when processing a photo. I know it sounds cliché, but really, the possibilities will become endless! Once you begin to understand the basics of layers and how they interact with one another, finding different ways to manipulate them is where the real fun begins.
There are other useful tools to be aware of when using layers that weren't addressed in those last two tutorials - this is what we will go over today.
Layer masks are a handy way of applying a certain effect to a particular area of a photo.
Sour Cherries (pictured below) was an instance where I used a layer mask.
I applied a texture to the photo, but I didn't want it to cover the cherries themselves, so I used a layer mask.
The video below is a pretty basic, but comprehensive tutorial on how to use layer masks.
This one is a useful tip on using quick masks, and is very short.
Below is a longer tutorial that will teach you various ways of using layer masks.
It may help to clear up a few things not discussed in the first video.
If you have more time, take a peek...
Don't forget, if you have any questions don't hesitate to ask. Also, if you have something that you would like to learn, but don't want to spend the time digging around, send me your suggestions.
A good tip to remember from this weeks Layer Mask exercise is "White Reveals, and Black Conceals".


I swear I'll get into it someday when I have more time to myself... can barely get all the day's tasks done as it is, I've no free moment to indulge in art (sniff).
ReplyDeleteHowever I greatly enjoy looking at your pieces, please keep them coming!!
thank you! I'm definitely saving the you tubes, I have to start learning more about photoshop - -
ReplyDeletesorry I haven't commented in awhile, as you know I have been on vacation - looking forward to seeing what I've missed!
Love the first shot but the cherries are my favorite!
ReplyDeleteHmmm .. this is very puzzling. I thought this would be an easier to way for the method where only part of a photo is in color and the rest desaturated, but it is not working at all. If I make two copies of a photo and make one into a layer in the other, it won't let me desaturate only one layer - it flattens all the layers into one that is greyscale. And if I desaturate one copy of the image first, when I turn the colored image into a layer in that image, it lightens the desaturated image and loses its own color. Very odd .. I will have to play with this more ..
ReplyDeleteI love what you did with those photos. In my house, my daughters seem to be the photoshop queens, I just sit and watch amazed
ReplyDeleteKimx
You are so sweet sharing all of this knowledge with us....I am still procrastinating, but keen to have a play. Maybe this weekend???
ReplyDeleteVery interesting. You are so smart.
ReplyDeleteI really like what you have done! Thanks for sharing your falling story - sounds painful, but at least you have a good story to tell!
ReplyDeleteAbsolutely love what you did with your concrete texture. So beautiful...
ReplyDeleteTD: Well, thanks for saying so....I appreciate that.....we won't hold your non-participation against you :) You'll do it when you're ready, mkay.
ReplyDeletea little bird: Once you take the plunge....it gets easier....believe me. Don't worry, I know you still love me ;)
arnold: That cherry photo is pretty special to me.....glad you like it too :o)
Elizabeth: Can you send me a link to a photo where the technique was used, and I will see what I can come up with.....so that I can attempt to help......I think I have an idea of what you're trying to do.
RR: haha, The children are much more advanced than the parents these days eh?
jacky: Sharing is what I love to do....You're such a busy lady....when will you find the time!?!
greg: I think.....I'm blushing....too bad you don't know the real me eh?! haha
please sir: Thanks! I don't remember the pain as much as the embarrassment!
kate: Thanks...did you ever have a go?
Thanks for sharing those vids. There's always something new to learn when it come to Photoshop! :)
ReplyDeleteYour photograph of the cherries remains one of the most beautiful photographs that I have ever seen! The colour and the textured background make so much difference.
ReplyDeleteThank you so much for the tutorial too. My photographs are virtually untouched with photoshop (apart from a tweak of contrast, brightness and the occasional border), and I always feel that something is missing. I am definitely going to have a go at the layer mask technique and look forward to your future lessons.
Darn, if I didn't live so far away, I'd be asking to reserve a week intesive photoshop training course :)